Render Images From Light Setup Dialog
Used to render multiple floating point images for each light or group of lights.
| Setting | Description |
|---|---|
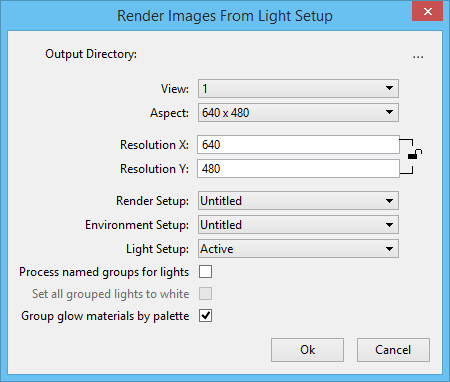
| Output Directory | Opens the Browse For Folder dialog, where you set the output directory for your image set. It is recommended that you make a new folder for each set of images for easy loading and editing. |
| Aspect | Select the desired aspect ratio of the rendered image from the drop-down list. |
| Image Size | Lets you set the values manually for X and Y resolution, to control the size of the rendering. If the lock icon is enabled then the aspect ratio of the image is locked to the aspect ratio of the view being rendered. |
| View | Lets you select the view you want to render from the drop-down menu by its number (from 1 to 8). |
| Render Setup | Lets you choose a render setup to use, just as you would do in a Luxology Render. If want to have edges for overlay, then you should enable that option in the render setup you are using. |
| Environment Setup | Lets you choose an environment setup. When you choose a physical sky, gradients, or an image, Effects Manager will automatically create two images - Environment Visible and Environment Indirect. The Environment Visible image will be visible with the Camera, Reflection, and Refraction visibility settings. The Environment Indirect image will only be visible with Indirect visibility setting. |
| Process named groups for lights | If on, lets you control multiple lights with one image much like a light switch. If you select this option, all lights in named groups are processed as being on, whether they are turned on or off. |
| Set all grouped lights to white | If on, makes grouped lights to be white in the render process. If off, the grouped lights which has a color in the design file will be tinted when you push the settings back to the design file. Every time you push your settings back to the design file, the grouped lights would be modified further and tinted more. If the lights are white to start then the RGB values are sent and not tinted, in other words a color temp of 3000K will be pushed back to the design with same RGB values as in the Effects Manager. |
| Light Setup | Select a saved lighting setup from the drop-down menu. An image for every light is created, that is found to be enabled or turned on in that setup. If on, the Solar light is also processed. Tip: You can change the color of lights in the Effects Manager; if you intend to leverage this feature, it is recommended that you set all your lights in the light setup to use white light. If you set a light to be blue in the setup and later try to change it to red in the Effects Manager, you will only be able to tint the blue light with red, resulting in a purple colored light.
|
| Group glow materials by palette | Lets you group many glow materials by palette so the behavior would be like a light switch, where the palette is the switch. Imagine a civil rendering where you might have hundreds of vehicles and you are using glow to make the headlights and taillights produce light. You would definitely want to control the on/off state of this image layer with a single image. If off, a separate image for every glow material being used in every palette in the scene is processed. |